my
myHow Much Does a Wet Room Cost?
At a Glance
- The average wet room installation cost is around £5,500.
- Most wet room installations take 4 to 7 days to complete.
- Full wet room installation cost breakdown for 2026 by wet room size and fittings.
- How long installing a wet room takes and what's typically involved.
- Use our wet room installation cost calculator for a quick estimate.
- How to find a local wet room fitter using MyJobQuote.
Get free estimates
Are you a trade? Get more work today!
£5,500
Table of Contents
- Wet Room Cost by Size (UK 2026 Prices)
- Wet Room Installation Cost
- Additional Wet Room Costs
- Disabled Wet Room Costs
- What Impacts the Cost of a Wet Room Installation?
- What's Involved in Installing a Wet Room?
- What Is the Cost of Wet Room Flooring?
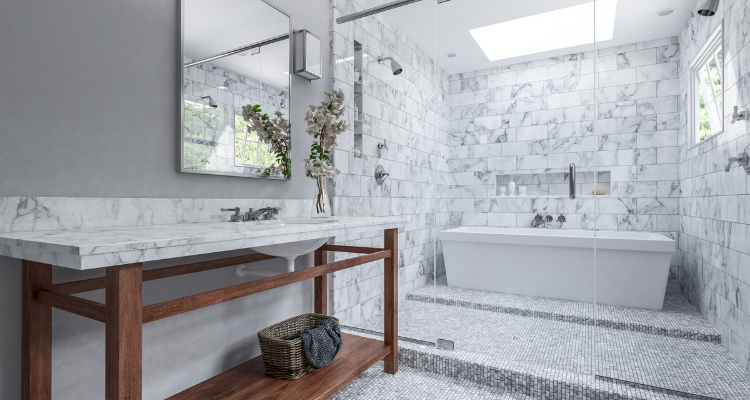
- Benefits of Installing a Wet Room
- Removing a Wet Room Cost
- Checklist: Hiring a Bathroom Fitter to Install a Wet Room
- FAQs
Wet Room Cost Calculator
Wet Room Cost by Size (UK 2026 Prices)
The size of your wet room and the level of specification will affect the overall cost. Below are typical installed prices based on a Midlands property, converting an existing bathroom in reasonable condition.
| Wet Room Type | Typical Installed Cost | Typical Specification |
|---|---|---|
| Small Wet Room (around 2m x 2m) | £4,675 | Shower area, toilet, basin, mid-range fittings, standard tiling |
| Standard Family Wet Room (2m x 2.5m–3m) | £5,885 | Shower, toilet, basin, new mid-range suite, underfloor heating or additional tiling |
| Large Or Luxury Wet Room (over 3m x 2.5m) | £8,360 | Full suite including bath, underfloor heating, feature lighting, higher-spec finishes |
Want a custom price?
Post your job
If you want a more accurate estimate, the calculator above lets you adjust the room size, fittings, finishes, and location.
Wet Room Installation Cost
The average cost of a wet room installation is around £4,000 to £7,000 and will usually take around 4 to 7 days.
Installing a wet room is not an easy job, and there are a lot of different parts to it. From tanking the bathroom to prevent water leaking, to tiling and rerouting pipework — it is not a typical DIY job.
You will need to make sure that the floor has a slight gradient so that the water runs to the drain correctly. If this gradient is not done correctly, you could be left with standing water, and it could cause problems over time.
This is where professional installation is important, as an experienced wet room installer will ensure the water flow is correct and that the room is fully waterproof.
Labour Costs
The average cost for labour when installing a wet room is usually around £1,700 to £2,000. Contractors will typically charge between £150 and £200 per day, and the job usually takes approximately 3 to 6 days. You may need 2 contractors for this type of work.
The location of your property can also affect the cost that you will pay. Those located in the London area can expect to pay around £30 to £100 more per day compared to those located in the North or other parts of the UK.
How much should I be paying for the labour, removing my current bathroom, disposing of it, making good, and installing the new bathroom suite?
"On average, a good tradesman can perhaps charge you a daily rate between £180 and £220 per day or price work, which can be anything between £1500 to £2500. However, this depends on the work required."
Wet Room Installation Cost Breakdown
Below is a breakdown of typical material and component costs for a wet room installation.
| Job Description | Cost |
|---|---|
| Tanking shower kit | £130–£180 |
| Shower tray former | £450–£550 |
| Shower | £400–£500 |
| Shower screen | £280–£320 |
| Tiles | £700–£850 |
| Tile adhesive | £60–£80 |
| Grout | £35–£50 |
| Spacers | £18–£25 |
| Labour | £1,700–£2,000 |
Want a custom price?
Post your job
Additional Wet Room Costs
There are several additional costs that you may need to consider for a wet room installation. A number of extras can be added to improve a basic wet room.
These additional costs can include:
- Underfloor heating - £300 – £400
- Tiling a shower- £300 – £400
- Toilet installation- £250 – £400
- Bath installation - £500 – £700
- Extractor fan installation - £300
- Spotlights or downlights - £300 – £500
- Skip hire for waste removal - £60 – £130
- Heated towel rail installation - £430
Hidden Costs to Budget for in a Wet Room Installation
Some wet rooms come in on budget, but quotes can increase once the existing bathroom is stripped out. These are some of the most common additional costs:
- Bathroom floor repairs or levelling — especially with timber floors that need strengthening before waterproofing.
- Structural work to reinforce the floor before tanking is installed.
- Moving drainage or creating enough fall to prevent standing water.
- Upgraded ventilation, including a new extractor fan and ducting to reduce moisture build-up.
- Electrical work for lighting or electric underfloor heating mats.
- Repairs to hidden water damage discovered during removal of old tiles or flooring.
These hidden costs are easier to budget for if your installer checks the bathroom floor, drainage position, and ventilation before work starts.
Looking to convert our spare bathroom in our extension to a wet floor bathroom. Is this possible and what would an estimated price be?
"That demolition job and installation of a new wet bathroom will cost £5,800."
Disabled Wet Room Costs
A disabled-access wet room can cost more than a standard wet room due to often needing additional safety and access features. A small disabled-access wet room installation typically costs around £4,950 for a standard conversion of an existing bathroom.
Prices can increase if structural work, specialist fixtures, or plumbing relocation are required.
Disabled Wet Room Cost Factors
- Additional space for turning and easier access.
- Grab rails, shower seats, and other assisted living products.
- Slip-resistant flooring to reduce the risk of falls.
- Wider doors or layout changes that require extra building work.
Grants And VAT Relief
If you need a wet room because of a disability or long-term health condition, you may be eligible for a Disabled Facilities Grant (DFG) through your local council. Some bathroom adaptations may also qualify for VAT relief in certain circumstances.
Eligibility rules differ by local authority, so it’s best to contact your council directly to find out what support may be available.
Ask a Trade
Got a question that only a tradesperson can answer? We have thousands of trades ready to answer any question you may have.
Ask your question

What Impacts the Cost of a Wet Room Installation?
Several factors can affect the cost of installing a wet room in your home. Below is a list of some of the main factors that can alter the price you’re going to pay for the job:
Extent of the Job
The more complicated the job is, the longer you can expect it to take. Also, if there is a lot of additional work needed, such as additional pipework, or if you are having intricate furnishings put in, this can also result in the job taking longer. If the job takes longer or is more difficult, then you can expect to pay higher labour costs.
The current ensuite is 8’6” x 4’10” with a tiled shower cubicle, WC, pedestal sink, and a radiator. I’d like to put the rest of the suite back in afterward to save money. How much money should I be putting aside to convert this into a wet room?
"The biggest job is removing the existing shower cubicle and tray, then once out, lowering the waste pipes into the floor and installing a preformed wet room shower tray. After this, you can bring the remaining floor height up to meet said preformed shower tray and tank the room to ensure no leaks at all. Tile where required and reinstall the existing suite.
Relatively easy job for any wet room specialist and a budget of £1500 to £2000 including materials should be plenty."
Relatively easy job for any wet room specialist and a budget of £1500 to £2000 including materials should be plenty."
Location of Property
The location of your property can affect the cost that you will pay for the work. People who are located in the London area can expect to pay around £30 to £100 more per day for the cost of labour than those located in the North or other parts of the UK.
How Many Contractors Are Needed
The professional installation of a wet room usually requires 2 contractors in order to complete the job effectively. For more demanding jobs or larger jobs, you may need more contractors.
Also, if you are having any speciality work done, you may need to hire additional specialists for this work. The average cost for a wet room installer is around £150 to £200 per day. So, you can see how the labour costs can add up if more contractors are involved.
Type and Quality of Furnishings
The type of furnishing that you choose can affect the overall cost of the job. You may choose to have basic furnishings or more luxury furnishings, all of which will differ in price and will affect how much you’re going to pay for the entire job.
Wet Room Size and Layout
The size and layout of your wet room will impact the overall cost. A larger bathroom space will require more waterproofing, more materials, and more labour. Tile costs can start at around £30 to £50 per m², so a bigger wet room will usually cost more to finish.
Wet rooms can work well in small bathrooms, but you may need careful planning to fit the shower area, toilet, and basin.
Floor Type and Condition
The type and condition of the bathroom floor can affect the final wet room cost. Timber floors or uneven subfloors may need additional work before the wet room installation can begin. If repairs are needed, floorboard repairs can cost around £200 to £800, depending on the extent of the damage.
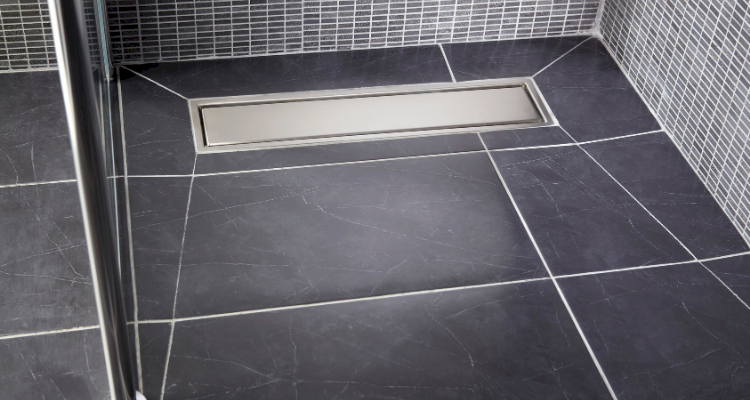
Drainage and Fall to the Drain
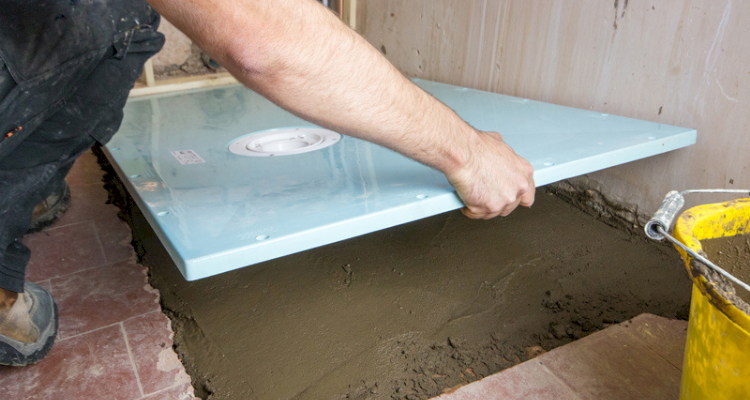
A wet room requires a correct fall so that water runs into the drain properly. If the drainage position is awkward or there isn't enough fall, installing a wet room can become more complex. A wet room former or shower tray former can cost around £450 to £550, which helps create the correct gradient.
How Much Plumbing Needs Moving
Plumbing costs can increase if pipework needs to be moved. Keeping the shower, toilet, and waste pipes in the same position is usually cheaper when installing a wet room, while relocating waste and water connections can add time and labour.
Preparation Work
The amount of preparation work required can affect the total wet room cost, which can include removing old tiles and fittings, repairing walls, and levelling the entire floor before waterproofing and tiling can begin.
Waterproofing and Tanking
Proper waterproofing is one of the most important parts of installing a wet room, as it helps prevent leaks and water damage. Tanking kits can cost around £130 to £180, and your total quote will also depend on the size of the shower area being waterproofed.
If the wet room is part of a wider bathroom renovation, costs may be lower than doing the work as a standalone project because trades are already on site.
I have a reasonably large downstairs toilet that I'd like to turn into a wetroom. The room is approximately 2m x 2.5m. How much would I be looking at cost wise for the conversion?
"You would be looking in the region of about £5000 depending on what materials and design you would like."
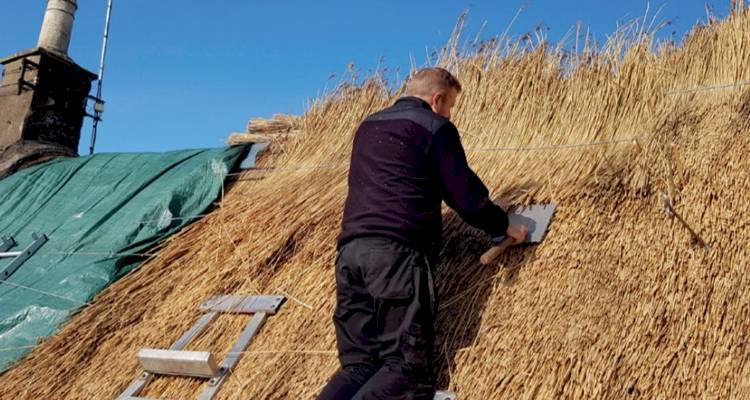
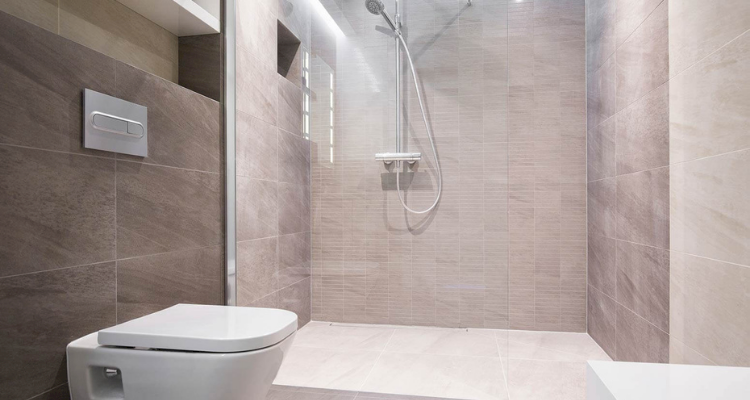
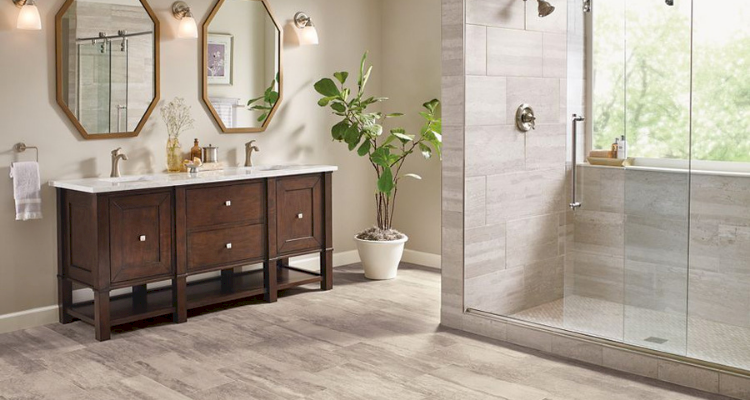
What's Involved in Installing a Wet Room?
Installing a wet room is not an easy job. It could end up costing you a lot of time and money sourcing all of the things that you need to get the job done. It also takes a very long time to install a wet room, especially if you are doing it alone.
It is important to hire a professional plumber to fit and install your products to ensure that they are installed correctly and to avoid the possibility of harmful leaks or blockages that may be caused due to poor installation.
Hiring a qualified professional means they will have the tools, equipment, and experience to install your wet room to a high standard, without any issues afterwards.
To find the right bathroom fitter and the best price, it’s always a good idea to get quotes from multiple contractors. With MyJobQuote, you can get quotes from wet room installers near you which are fast, free, with no-obligation to go ahead.
Here’s a brief overview of the process you can expect when you hire an experienced professional to install your wet room:
Before the Job Starts
- Initial Survey & Design — The contractor will assess the space where you want your wet room installed, checking the walls and floors will allow for the correct drainage and ventilation. They will also work with you to design your wet room and choose the fixtures and finishes.
- Checking the Floor & Structure — The floor needs to be solid and level to be suitable for proper waterproofing, so your contractor will check this and make sure any weak spots are reinforced before work begins.
- Planning the Drainage & Plumbing — Planning the layout of the plumbing and drainage pipes is essential to make sure the wet room has the correct fall angles to make sure the water drains efficiently.
During the Job
- Preparing the Room — If converting a current bathroom, any previous bathroom fixtures and plumbing are removed, and the room is stripped back to a bare structure, ready for installation.
- Installing the Waterproofing (Tanking) — The space needs to be completely watertight, so specialist membranes and waterproofing products are applied to the floor and walls.
- Installing the Drain & Flooring — Using a wet room former or a carefully formed screed base, the floor around the drain is shaped to create the necessary slope into the drain, and the rest of the wet room floor is laid.
- Installing the Plumbing & Fixtures — The chosen fixtures, i.e. the shower, toilet, and basin, are all plumbed in, and other features such as underfloor heating mats or underfloor heating systems are connected.
After the Job
- Sealing & Finishing Touches — All the grouting and silicone are applied to complete the waterproofing and final checks for any leaks are carried out.
- Ventilation & Safety Checks — Checks are carried out to ensure the new wet room has adequate ventilation and the floor surfaces are slip-resistant.
- Certification & Guarantee — Finally, you should receive any appropriate guarantees and certification for the plumbing and electrical work, where applicable.
What Is the Cost of Wet Room Flooring?
There are several wet room flooring options to choose from. The right material will affect durability, slip resistance, and compatibility with underfloor heating.
Below is a list of the different types of wet room flooring and some information on each of the different types:
Tiled Flooring Cost
Tiled flooring is the most common option for a wet room. There is a wide range of designs available, making it easy to match your preferred style.
Tiled Wet Room Flooring: £30–£50 per m²
- Maintenance: Easy to clean with standard bathroom products.
- Durability: Hard-wearing and suitable for high-traffic bathrooms.
- Slip Resistance: Non-slip tiles can reduce the risk of falls.
- Compatibility: Works well with electric underfloor heating mats.
- Design Range: Available in large tiles, natural stone, and mosaic styles.
Vinyl Flooring Cost
Vinyl flooring is another popular wet room option. When installed correctly, it can act as a waterproof surface across the entire floor.
Vinyl Wet Room Flooring: £20–£40 per m²
- Maintenance: Simple to clean and maintain.
- Durability: Water-resistant and flexible.
- Slip Resistance: Often less slippery than some standard tiles.
- Installation: Can create a seamless finish with fewer joints.
- Cost: Generally more affordable than natural stone options.
Microcement Flooring Cost
Microcement creates a smooth, modern finish with no grout lines. It is often chosen for contemporary wet room designs.
Microcement Wet Room Flooring: £80–£120 per m²
- Maintenance: Easy to wipe clean due to its seamless surface.
- Durability: Hard-wearing when professionally applied.
- Finish: Creates a seamless finish with a modern design.
- Compatibility: Works well with underfloor heating systems.
- Design Options: Available in a range of colours, although fewer patterns than tiles.
What makes a good tile for a wet room?
"The most suitable types of tiles for a wet room floor are Porcelain, Natural Stone or Mosaic tiles. Because of there construction we do not recommend the use of ceramic tiles on a wet room floor, they are however perfect for the wet room walls.
Benefits of Installing a Wet Room
There are several benefits to a wet room. Here is a list of some of the main advantages of installing a wet room in your home:
- Adds a Touch of Luxury — The modern style of a wet room can add extra luxury to your home. There are many additional features that you can add to your wet room to make it feel even more luxurious such as underfloor heating or luxury décor.
- Completely Waterproof — When a wet room is installed correctly, it is entirely waterproof. This provides reassurance that water won’t leak through the walls or floor.
- Easy to Clean and Maintain — Wet rooms are deemed easier to clean than a traditional bathroom. This is particularly true when the room has a wall hung toilet and sink. This provides easy access for cleaning the floor.
- Increase the Value of Your Home — When you add a wet room to your home, it can increase the value of your home. For the best results, it is best to install a wet room as a second bathroom or to install a bath in it.
- Flexibility in Layout and Design — A wet room allows you to unleash your creativity as you can add many different design and décor elements based on your personal style.
- Provides Convenience and Safety — The level access of a shower in a wet room is a safe and practical option. Shower trays are usually finished with non-slip tiles which provide both safety and style.
Removing a Wet Room Cost
How much does it cost to change a wet room back to a bathroom?
You may want to remove a wet room to install a regular bathroom. If this is the case, it is quite a big job that is likely to cost between £3,000 – £6,000 depending on the size of the room and the type of suite and décor.
To remove the wet room, you will need to remove the flooring and replace it with new flooring. You will also need to remove the shower and replace this with either a new shower or a bath, or a bath/shower mix.
Removing and replacing a wet room is a challenging job that is likely to take around 7-10 days. You will need to hire a professional company to handle this for you. When getting a quote for this, the contractor will usually include all of the different elements of the job, including the replacement process and waste removal.
Checklist: Hiring a Bathroom Fitter to Install a Wet Room
There are a few things you will need to consider before hiring someone to install a new wet room for you. Below is a list of some of the main things that you should consider when having professional installation:
- Are they TrustMark registered? TrustMark is the government-endorsed quality scheme, and registered businesses are vetted for quality of work and trading practices.
- Are they a member of a recognised trade body? Look for membership with organisations such as the Chartered Institute of Plumbing and Heating Engineering (CIPHE) or The Tile Association (TTA).
- Can they certify any electrical work? If electrics are involved, such as underfloor heating or lighting, make sure it’s signed off by a registered electrician (for example NICEIC or NAPIT).
- Do they have experience? Ensure the person or company you hire has lots of experience with wet room installations and can show evidence of their work.
- Do they have insurance? Public liability insurance helps protect you if something goes wrong during the wet room installation.
- Do they offer a guarantee? Ask what is covered and how long it lasts.
- Will they provide an itemised quote? Ask for a clear breakdown, so you know what’s included and whether there are any additional costs.
- Do they have positive reviews? Check their MyJobQuote profile to read feedback from previous customers.
Ready for a quote?
We have a range of wet room fitters ready to offer you a free quote!
FAQs
What is a wet room?
A wet room is an entirely waterproof or tanked bathroom with a shower area that is at the same level as the rest of the floor.
What is the best thing to clean a wet room floor with?
A wet room floor can be easily cleaned with warm water and a mop. Add some standard bathroom cleaner to the bucket and moisten the mop in the warm water. Work in sections and mop in small circles to lift all of the dirt away.
How small can a wet room be?
A small wet room can be around 1.5m x 1m with enough space for a washbasin and toilet as well.
Do you need planning permission for a wet room?
You usually do not need to have planning permission for a wet room unless it is being built into a new extension on your home.
Do you need building regulations for a wet room?
Building regulations may apply if you are converting an existing room into a wet room, or working on a new build. Building regulations rules will vary from job to job, so it is best to seek advice. A professional wet room fitter will be able to create a plan for your new wet room. They will be able to advise and adhere to all of the relevant building regulations rules as needed for your particular project.
What is the most popular flooring type for a wet room?
Tiled flooring is the most popular wet room type.
Can I install a wet room myself?
It is not recommended that you attempt a wet room installation yourself.
Installing a wet room is not an easy job, and hiring a qualified professional means they will have the tools, equipment, and expertise to complete the project to a high standard.
Do I need to tank a wet room?
No matter how good your tiling and grouting is, the changes in temperature and humidity can cause fine cracks which can allow water to leak through the walls or floor. This is why a wet room should be tanked. All tiling in wet areas of the wet room should be fully sealed with a waterproof membrane below them.
Is a wet room more expensive than a walk-in shower?
A wet room is generally more expensive than a walk-in shower. For a wet room, you can expect to pay between £4,000 and £7,000. In comparison, replacing a bath with a walk-in shower typically costs between £1,000 and £5,000, depending on the design and chosen finishes. For a more detailed breakdown, read our replace bath with a walk-in shower cost guide.