 my
myGuide to Mixing Plaster
If you plan on mixing and laying out the plaster in a DIY project you are going to undertake, not only do you have to understand the basics of skimming, but also how to go about choosing the right plastering materials to work with as well. This is a basic guide to help you on your way to skimming, plastering, and making sure any DIY task is properly done, when you are ready to undertake it.
More than one option –
There is more than one type of plaster you can work with when plastering a wall. Some of the most commonly used include:
1. Bonding –
This type of plaster is used to bond materials. It is an undercoat or the first coat you would apply and will serve as an ‘undercoat' to the outer layer of plaster that goes above it. It is extremely sticky so you can easily place other coats/types of plasters above it, when reinforcing a wall or surface you're working on.
2. Browning –
This is another type of plaster which is also used as a base layer or coat, however it is best on porous surfaces. When raking out joints, or covering a surface, this plaster is a great base coat for you to apply before you do skimming and levelling work on a surface.
3. Hard wall –
If you are plastering a surface which needs more resistance or greater strength, this is the plaster you are going to want to choose. It can be used on masonry surfaces, and is a great undercoat or base layer when working on projects.
4. Tougher coat and drywall –
Like the hard wall variety, tougher coat plaster is ideal for coverage, and suitable up to 11 mm in depth. It is ideally used on porous surfaces. Drywall plaster is exactly what the name says, it is intended as a coat or adhesive when working on drywall.
5. Multi or board finish –
A multi finish plaster can be used on various surfaces/finishes and textures. When finishing plaster on various surfaces, it is a great option for optimal levels of adhesion. Board finish is great for lower levels or surfaces, traditional around floor or wall-boards.
6. One coat plaster –
This is ideal for a smooth finish, when you just want to apply a single coat of plaster. It is typically used on surfaces 25 mm or smaller, but some manufacturers claim it can be used on areas of up to 50 mm. It is adhesive, powerful and typically will only require one coat when you are working on larger projects.
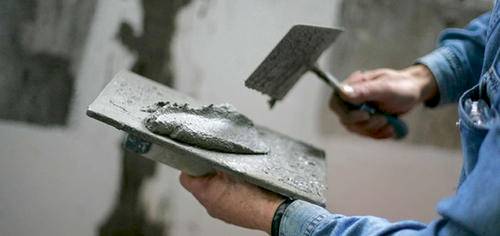
Working with plaster –
In order to work with it, you are going to initially have to mix the plaster base. This is a trial and error phase. Depending on the thickness, the amount being used and the surfaces you will apply it to, the finish is going to differ for each project. Ideally, a cement mixer is a great tool to have. It not only mixes quickly, it also removes any lumps that are in the plaster base, to ensure a smooth finish on the surfaces you are working on.
With finishing plasters or board plasters, you can use a mixing paddle and small bucket. Simply mix to the desired smoothness/texture, and apply a test coat to a “waste” board or drywall sheet. This will allow you to see the texture, firmness and whether you need to adjust the base prior to using it on any surface or project you are actually going to do work on. Using clean, cold water, and placing it in the bucket before the plaster, will make mixing easier and allow you to achieve the desired texture with less effort.
Laying the plaster –
This is a task which you'll only get better at with time. You can start with thin coats, and you can initially use stop beads to ensure you don't go over edges or over-apply the plaster you are working with. External angle beads are also ideal for tight corners or edging you are working on. Not only to help keep you on track, but also to ensure you don't go off the surface you are working with onto surfaces which shouldn't have plaster on them.
“Scooping” up to two trowels onto the wall at a time, and using your angling blade to smooth out the surfaces is a great way to start. Not only will you have enough plaster but you can easily smoothen it out and level it when working with the trowel tool on different surfaces/textures or walls. When smoothing the plaster you can work with boards or metal levellers and simply run the up the wall to smooth out the surface and remove excess plaster. Using the hawk and trowel will also allow you to find missing areas or surfaces where plaster didn't properly penetrate through plaster beads so you can smooth out and apply additional plaster to these areas when skimming and levelling the walls.
When working with nooks or tight corners, there are many small tools you can work with to avoid damaging the levelled, smooth wall you have just plastered. Working with these ensures you won't damage the top-wall you just levelled but also ensures you can properly apply plaster to smaller areas or those which are a different texture or shape than the rest of the wall you are working on.
Top coat –
After a couple hours and after the base layer is completely dry you are going to apply the top coat of plaster onto the surfaces. If you allow more than 3 hours to pass between plastering, apply a damp cloth and wipe the walls to ensure the top coat is going to be properly levelled and will ‘stick' to the base surface you have previously laid out.
You can use a mixing tool to mix and create the ‘batter' base for the top coat you are going to apply. You can do this similarly with a stand or cement mixer in a bucket with cold water. You will lay the over coat on as you did with the undercoat, smoothing and levelling the different areas as you work over the wall's surfaces. You want to do this as quickly as you can then go back to the starting point and make any repairs or go over missed areas to ensure a level, smooth finished layer.
Once it is almost dried completely, using the trowel over the last layer you apply is a simple way to ensure the plaster is completely levelled and the wall or surface you are working on is going to be as smooth as possible when finished. You can also apply a few drops or splashes of water on the wall to remove the trowel marks once finished so that the wall looks as smooth and feels as smooth as possible when the layer has completely dried.
If you are going to fill patches or do repair work on walls, rather than plaster an entire wall to create a smooth surface, the same process can be used to achieve the desired finish and smoothness on the walls you are working on. Bear in mind that all of the surfaces and textures you are working with will differ. Therefore, you want to know the type of plastering material to use and want to work with the materials which are specifically intended for the types of walls or surfaces you are going to plaster. Not only to ensure a smooth and even finish but also to ensure it won't require too much exertion or effort when working with the wrong materials.
The right equipment will help –
Using trowel and hawks, the right mixers, cement mixers, and other stand mixers to help you blend the water and plaster base is also important. Not only will it take you less time to perform when you are using the right tool but it is also going to require far less effort from you when mixing the base. It will ensure the base looks as it should and the proper texture is achieved as well when you are working with the different varieties of plastering materials that are available.
There are many specialty stores you can visit or order materials online for you to work with the plastering materials you are mixing. So, take the time to learn about these supplies, how to use them and the types of plastering materials they are intended to work with in order for you to do the job properly and see the desired outcomes when you are plastering walls or doing repair work with plastering material on other surfaces you are working on.
Although not easy at first, over time you'll get the hang of it. These are a few steps to guide you through mixing, plastering and levelling surfaces regardless of the type of plaster you are working with or the surfaces/walls you are going to apply the plastering materials to when working.
Last updated by MyJobQuote on 19th April 2018.